corne keyboard
an experiment in workflow
What is a split keyboard?
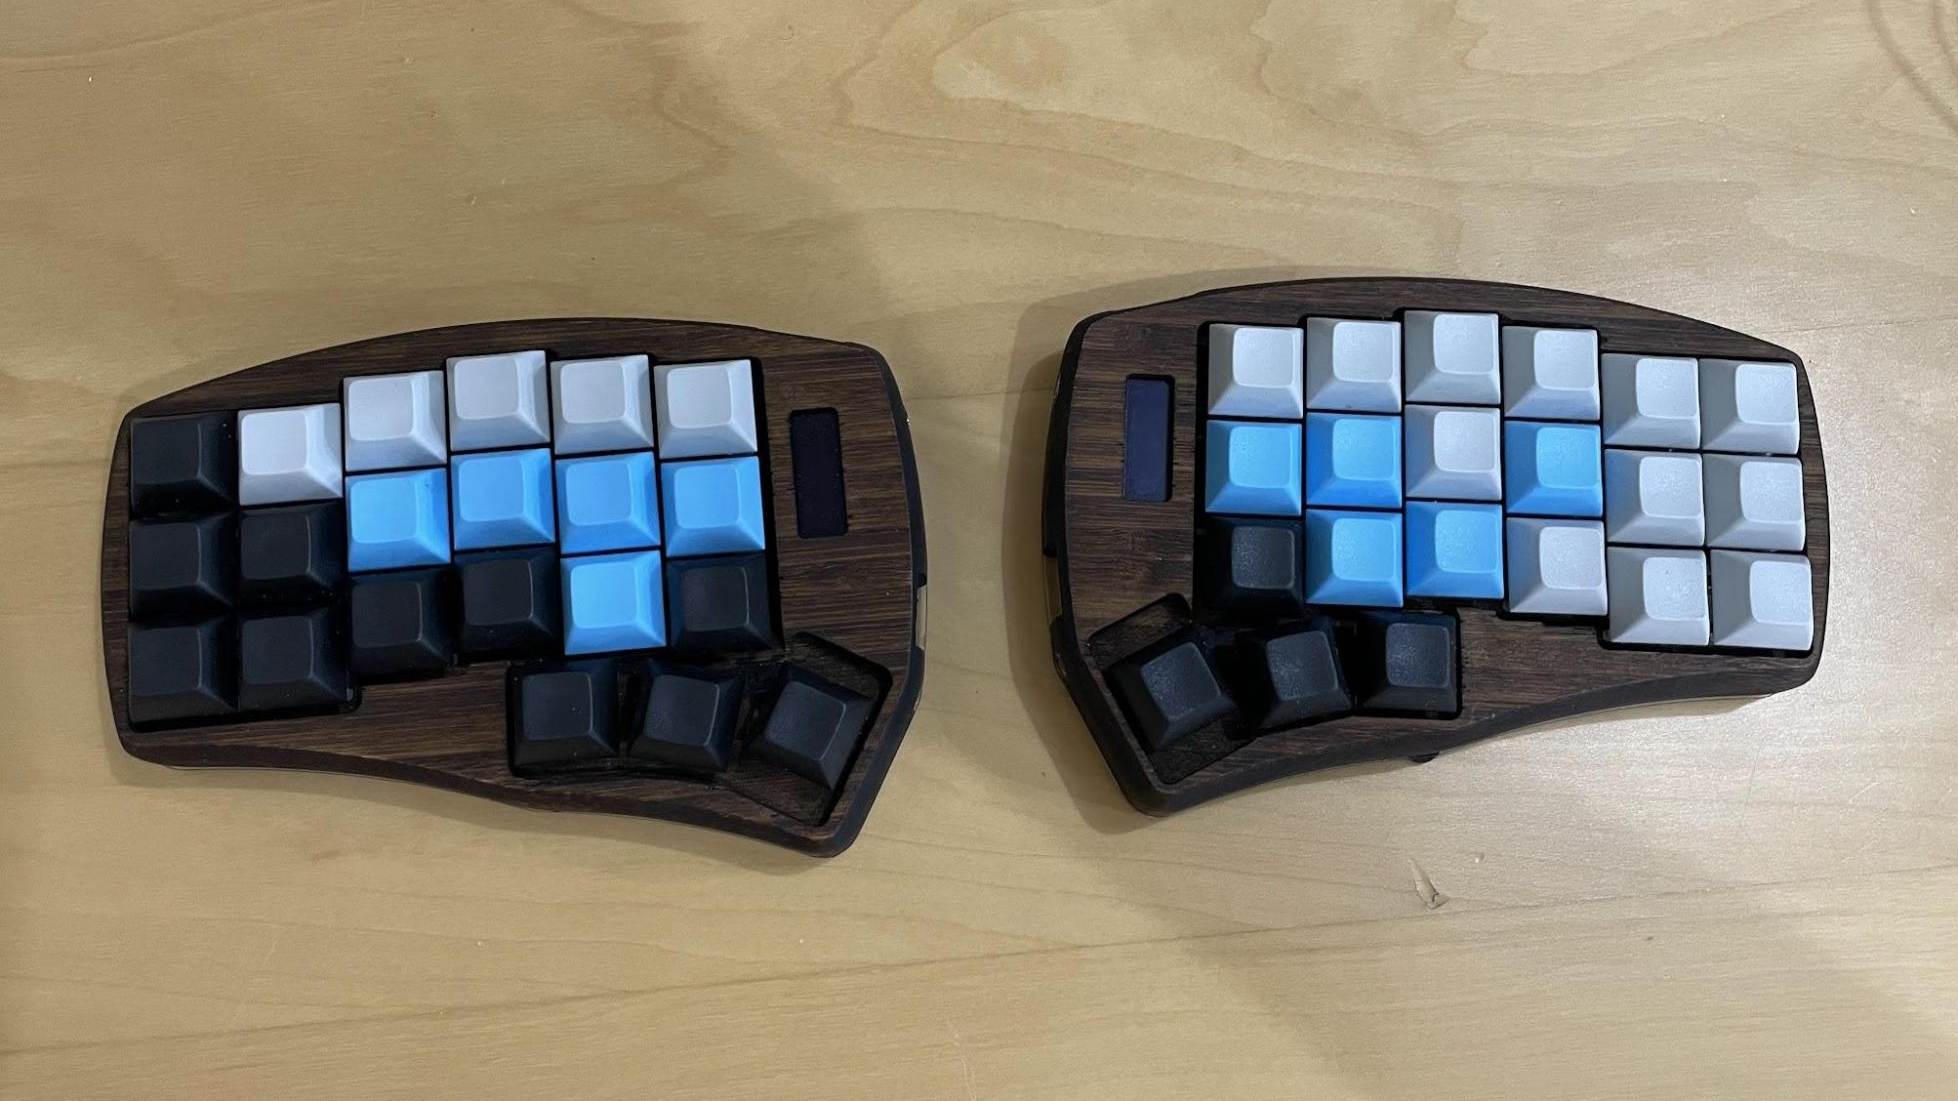
This is a split keyboard. In fact, this is my split keyboard. It is a crkbd corne, which I have programmed a custom keymap for.
Why would anyone want a split keyboard?
A split keyboard is a significant improvement in ergonomics. Most keyboards have people's arms twisted in and their fingers at awkward angles. This position also scrunches people's shoulders together. When the halves of the keyboard are moved apart, your shoulders open up. Also, in the ergonomics department, you can “tent” the keyboard. When people's hands are palms down in front of them, it puts extra pressure on the forearms. Once you tent the keyboard, which is to raise the edge in the center, it puts your hands into a more neutral position. Some people tent their keyboards so the halves are almost ninety degrees, while others do more like fifteen through thirty degrees.
The keys on this keyboard are ortholinear, which means they go in vertical rows. This means that each finger has to travel less distance and the finger movement is more natural. Also, because there are fewer keys, a finger only ever has to reach a key that is one key away from the home row. If your hands never leave the home row, then you can have a very accurate mental map of where all the keys are. Part of the design philosophy behind a keyboard with less keys is that when you have less keys, you don't need to stretch your fingers to get to any key. This is something I didn't notice much until I started programming more heavily and was typing ctrl+shift+arrow keys, parentheses, and function keys a lot. Each time I had to type a complicated chord (combination of keys) or move my hands away from the home row, it would take a bit to reset. Using a split keyboard completely eliminates this. Through keyboard shortcuts, I can type, edit text, and swap programs without having to take my hands off the keyboard. I'll include a non-exhaustive list of useful keyboard shortcuts at the bottom of this page. The split keyboard isn't quite like a full fledged vim editor, but it's close. And, when I'm typing and editing, my hands almost never move. It really feels like magic.
Split keyboards are fun! You can design your own keymap and layout, and program the LEDs and screens to do exactly what you want. This allows a ton of creativity and people have come up with clever keymaps.
Split keyboards allow you to use your thumb more effectively. An opposable thumb is a genius of engineering, and for input we only use it to hit the spacebar. Split keyboards often give multiple keys to the thumb, so that another digit can be used effectively. This is something that I can't believe I've never thought of before. Why have my thumbs been so underutilized on all keyboards before this?
Finally, split keyboards are more portable than full sized keyboards. This is great when some days I work from home and some days I go into the office. I can easily transport my keyboard between places.
How can you type/program with so few keys?
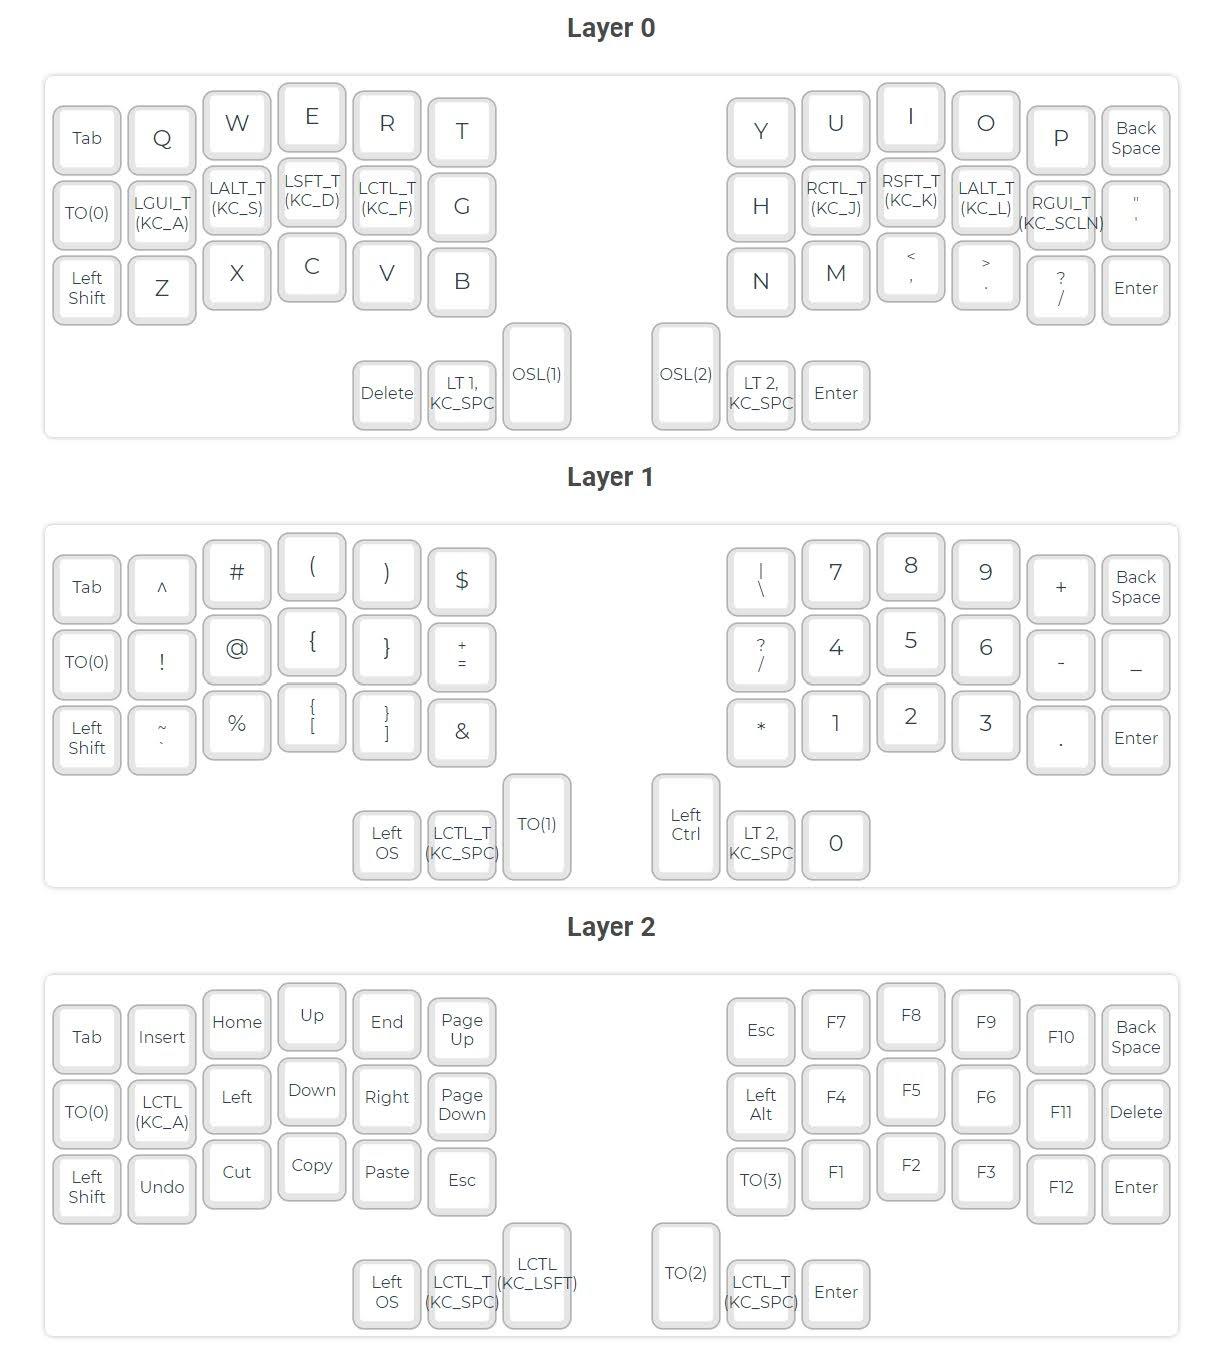
Aha, this is really the crux of the question. This keyboard uses layers to easily access every key. In fact, I would argue that it's easier to type any key than on a 100% keyboard. (Mine is a 40% keyboard.) Everyone already uses at least one layer on any keyboard, the shift layer. A key will output a lowercase letter, unless shift is held down or capslock is on. This functionally doubles the number of characters a keyboard can output. Not counting shift as a layer, this keyboard has three layers. The first contains all the letters. The second contains all symbols and numbers. The third contains all navigation keys and function keys. With a keyboard like this, you can program as many layers as you want. Here is a map of my keyboard layers.
After only a few weeks, I have almost every key memorized on each layer. This is way better than on the standard keyboard, where I always have had to look down to know what symbol I want to type.
This keymap has a few things that I think are really cool. The first is called Home Row Mods. This allows me to press the windows key, alt, shift, and control using the keys on the homerow, rather than having to move my fingers to any keys. If I need to shift a key on my left hand, I press shift with my right middle finger. If I need to press shift with my right hand, I hold down my left ring finger. This is amazing. If you want to know more, click the link above.
The second cool thing is that I have a numpad for my right hand. Typing numbers on a numpad is more intuitive, though I recognize that basically everyone has gotten used to the number row. I hold down one key with my left thumb, and I'm in my symbols layer. Then I can type all the numbers I want, and when I release that key, I'm back to typing letters.
The other keyboard feature that I like a lot is having arrow keys right where my left hand naturally rests. I have gotten used to using WASD playing many games, but when I was making the keymap, I realized that while typing, my hand naturally rests on ESDF, which I still think of as WASD, just shifted over one key. This way, when I'm in my navigation layer, I don't have to move my left hand over a key to get to the arrow keys.
If you're still with me, one of the final cool keyboard layer features I designed was how to move between the layers. Most split keyboards come with a layer shifting feature that works like a shift button. While that key is held down, you are in the layer. This is very intuitive and useful, but after watching Ben Vallack's YouTube channel, I saw that he was trying to avoid “chording”, which is where you press multiple keys at once. So I made a second way to access the layers. The first way is to hold down space. Space on the left side takes you to the symbols and numbers layer. Space on the right side takes you to the arrow keys and function keys layer. The second way is to tap the button next to space. When you tap it, it will take you to the layer for one keypress. This is useful, for example, when you want to hit a function key at a specific time. You can tap the button next to space and know that your keyboard will interpret the next keypress as that layer. But now, what if you want to stay in that layer? If you tap the button a second time, it'll keep you in the layer. A third key has been programmed to always take you to the alphabet layer, no matter what layer you are on, and when you are on the alphabet layer, it does nothing. This way, if I need to do a lot of arrow key movements, I can double tap my layer switch key, do the movements, and if I want to go home, I can tap the alphabet layer key. I think that this system is pretty intuitive, and better than if the key took you to the layer and the same key took you back home. There is minimal visual feedback with this keyboard, and you often want to be very sure you know what keys you are pressing. If you followed all of that, good for you! This system is not perfect, and I'm still thinking of ways to improve it, but I've been using it for the past few weeks and enjoy it. I hadn't seen any keyboard layouts that did something similar online, and I researched multiple before starting to make my own. My keyboard files are available on my github.
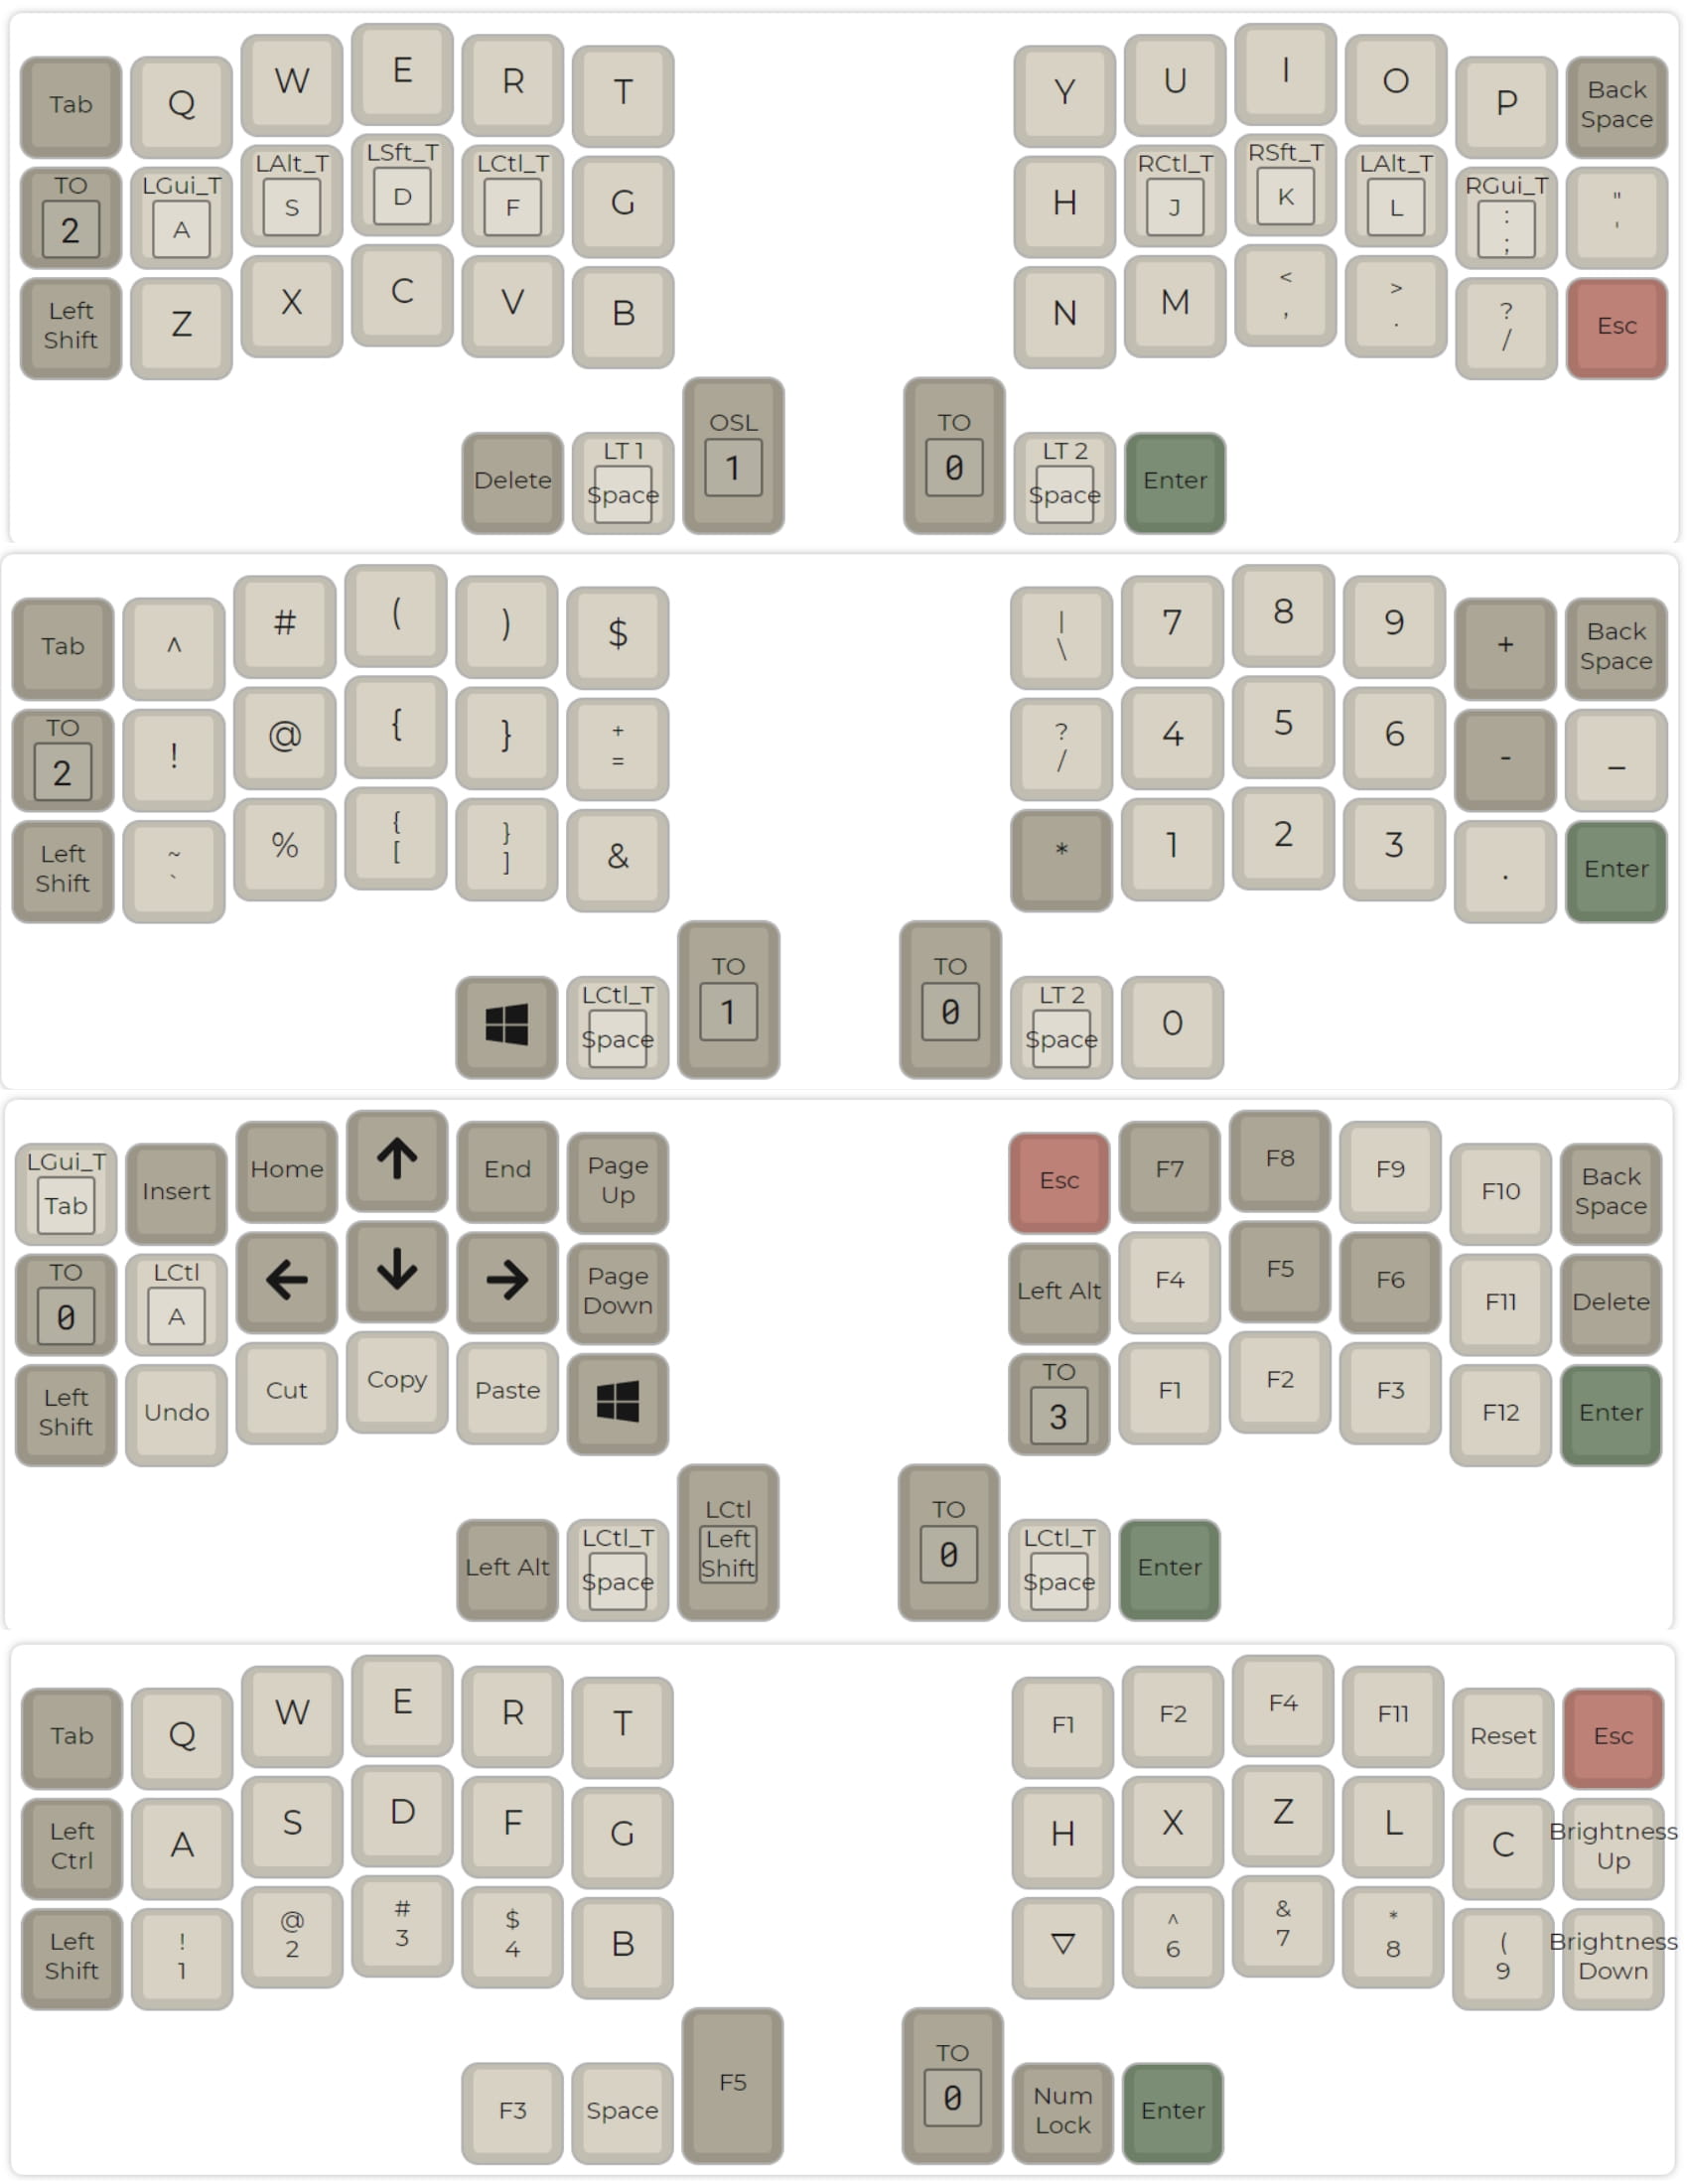
This is my updated keymap. I changed how the layers are accessed a
bit, to make the navigation layer more prominant. I also added a
few keys that I ended up needed. This is the 8th varient of this
keymap, but I think it'll be the last. I'm currently working on a
new keymap that uses more layers, to put frequently used keys in
easy to reach spots. Also, this keymap is totally full. I wanted
more keys, and I figured I may as well redesign it from the ground
up. When I have the new keymap working, I'll add it to this
website. :)
Also, the fourth layer is specifically for
playing Minecraft :P
How do you get a split keyboard?
There are many options. If you already have mechanical key switches and caps, the cheapest is probably to build your own. This would cost around $30 (if you have a 3D printer) to $80 (if you don't). If you just want to assemble the parts and not do any soldering, expect to pay around $200. You can also sometimes find split keyboards on esty or ebay around that price. For a fully assembled professionally made one, expect to pay anywhere from $250-up. The ZSA Moonlander is well regarded and has very customizable software. If you want one that is sculpted to your hand, look for the Kinesis Advantage2 or a Dactyl Manuform. These get more pricey. If you want fewer keys, look for a Ferris Sweep or crkbd Corne, like I have. There are almost infinite variations of split keyboards that people have come up with. Some have tenting built in, and others don't. Some have a trackball or a trackpoint built into the keyboard. I'd like to build one of those and see how I like it, because it would mean that I would have to reach for the mouse less than I already do.
Skills demonstrated:
-
- Reading documentation
- Adapting other people's code
- Critical thinking and design
- Code base: C